I was puzzled for awhile to make addShare social button working with iWeb. Finally this tutorial came to rescue.
Showing posts with label Technologies. Show all posts
Showing posts with label Technologies. Show all posts
Saturday, May 14, 2011

Tuesday, January 19, 2010
Jailbreak iPhone OS3.1.2
Now blackra1n does it all, jailbreaking and unlocking iPhone.
This is specially for OS 3.1.2 with Modem base 05.11.07. Follow the simple steps provided by iClarified in the following link:
http://www.iclarified.com/entry/index.php?enid=5886
Pick sn0w if you want to unlock your iPhone.
Note, while in the step of “Post Install Log for sn0w”, it may take long time to get it completed. If it takes longer than a few minutes, you may just abort it by hitting the Home button and start blackra1n over again. The second time should be a smooth sailing through the black rain.
Updated (2010-01-20):
Using iPhone Browser, the real root directory “/”could not be seen. You can install afc2add service via Cydia to resolve this issue.
Saturday, January 9, 2010
LanManServer hands on startup
My 64-bit Vista desktop started showing a very slow startup. Every time when it starts up, I had to wait for about 20 minutes until the network connection becomes available. This problem bothered me for weeks.
This is apparently due to Vista somehow booting up services in wrong order causing some dependant services hanging. I was trying to look at solutions in the Internet, but don’t have a proper set of keywords for googling, until I noticed in Task Manager there was a service “lanmanserver” hanging in as “starting” but couldn’t run until about 20 minutes waiting.
Now I’ve finally found a perfect solution related to “lanmanserver hang vista 64 bits” google keywords. Thanks to DEANREILY who posted it.
Here is the recap of what I did according to this solution:
1) Use regedit in administrator mode
2) Change entries in HKEY_LOCAL_MACHINE\SYSTEM\CurrentControlSet\Services\Spooler. Double click on "DependsOnService" entry. Add (append) three separate lines:
LanmanWorkstation
LanmanServer
LmHosts
2) Change entries in HKEY_LOCAL_MACHINE\SYSTEM\CurrentControlSet\Services\NetLogon.
Double click on "DependsOnService" entry and find the "LanmanWorkstation" line and delete it. Add a "LanmanServer" line If you don't see it.
My system had one line “LanmanWorkstation” before the change.
3) Click OK and exit the Registry Editor. Restart your computer. The 20 minute delay on start up problem should be gone.
Updated (2010-01-17):
The above solution will cause the Print Spooler service being unable to start any more, so all added printers are lost.
The root cause is really due to load order dependency of Print Spooler and Network.
Scenario:
The spooler (I have a network printer server) wants to start but Network has not started yet.
Solution (Kludge):
Simply set Printer Spooler service with manual start. (Note: Printer Spooler does not support delayed automatic start)
The Network will start normally. No more 20 minute delay. Then manually start the Print Spooler service, or whenever needing a printing job.
Sunday, July 12, 2009
Transfer Apps from iPhone to a New PC
If you’ve ever tried to synch up your iPhone to iTune on a new PC, you could end up lose all apps that you installed in your iPhone.
Before you decide to synch your iPhone with a new PC, make sure to perform the following steps to ensure all apps can be safely transferred to and preserved on your new PC.
0. Connect iPhone to the new PC. DO NOT SYNCH at this moment.
1. In the iTune of the new PC, authorize this PC to take apps. Note that you only have up to 5 PCs for apps transferring.
2. Right click your iPhone under the DEVICES at the left explore list and then select “Transfer Purchase”.
3. Then iTuen starts transferring all the apps from your iPhone to the new PC.
Shrink Hard Drive Partition
How to shrink a large sized partition is a bit tricky.
Here is the use case. When you bought a new PC with just a single partition as Drive C: with the Vista OS installed, you may want to shrink it down and leave extra space to another partition (say D: for your personal files).
If you try to directly shrink the C partition, it is often found that you could not shrink it as much as you wanted. This is because that some files are located nearly at the end of the partition that needs to be shrunk.
You can use PerfectDisk 8.0 to defrag those files and move them to be more compact in chunks near the beginning location of the partition. Even so, the 30-day free trail version of PerfectDisk isn’t that perfect as some system files are so persistent to be moved around.
Here is the tricks:
1. run PerfectDisk to defrag and clean up more free space first. Chances are that not much available space can be freed up.
2. try moving system files with PerfectDisk. It requires rebooting the system and perform such moving operation at the very beginning of next bootup. The consequence may improve a little free space, but still not enough to be shrunk as you needed.
3. At this moment, go ahead to use Vista Storage Management to shrink this partition to gain whatever available space for new partition.
4. Then repeat steps 1-2, amazingly you can further defrag and clean up more free space right after shrinking operation at step 3.
5. Repeat step 3 to shrink this partition further to whatever the Storage Management would allow you to gain.
After a few tries, you will be able to get enough size for the new partition as you desire so. Then you can format the new partition (say Drive D:) and start using it.
Thursday, July 9, 2009
Got my new Intel Core i7 PC
Newly ordered a Dell Studio XPS with Intel Core 7i inside. This baby has 4 cores, which are showing 8 threads in the Task Manager.
I’ll benchmark it later until I get an Mac Leopard running on it.
Here are the names I gave to my recently owned computers:
- Egghead (a generic one I built by myself)
- Poet (Dell XPS 9150 Dual Core)
- Pundit (Dell M1330 laptop Core 2 Due)
- Swami (Dell Studio XPS Core i7 quad)
I just wonder what the next PC’s name will be.
Saturday, May 30, 2009
When Brand-Name Quality Meets Low Price
I did some searches on Sony LCD TV and was surprised that most it's LCD TV products appeared consistently cheaper than Samsung's. I would applaud for Samsung's recent branding achievement with its new thin LED screen which allures a colorful hummingbird in their TV commercial. However when Sony price goes under Samsung's, my decision on buying a TV becomes a no-brainer.
So I had just ordered a SONY KDL40V4100, at an absurd tag $775 (in total)!
Saturday, May 9, 2009
Installing MAC OS X on a PC (dual boot)
Install Mac OS X to Dell M1330 (dual boot)
1. Preparation
- burn iATKOS v5i (OS X 10.5.5) ISO DVD
- Boot with Vista DVD
- Go to repair, then command console, issue DISKPART
- Delete all partitions in hard disk (WARNING: ALL DATA LOST)
- create two partitions on disk0 (149GB)
1) for Vista: 100GB with default type
2) for OS X: the rest (49GB) with ID=af (late, OS X installation will recognize this partition)
2. Install Windows Vista
3. Install iATKOS v5i
Refer to Installing Mac OS X on a PC (single boot).
4. After the two OS's are installed, reboot PC and Darwin Bootloader will appear. Type F8, then select the OS to boot.
Tuesday, May 5, 2009
Installing MAC OS X on a PC (single boot)
Install Mac OS X to Dell M1330 (clean install)
1. Preparation
- iATKOS v5i (OS X 10.5.5) ISO DVD
- Delete all partitions in hard disk
2. Install iATKOS v5i
- insert the DVD
- boot computer from DVD
- Darwin bootloader starts, hit F8 when counting, and type -v then hit enter to continue
- OS X loading from DVD. Once loaded, hit ..> button at the bottom right
- Once top manu bar appears, Utilities --> Disk Utility
- select the disk (on left side), select Mac OS Extended (Journaled) and name it as "Leopard". A new partition under the disk is created
- still select the disk, click partition, resize the Leopard partition to 50GB and apply
- exit Disk Utility
- continue, will find the Leopard (50.12GB) disk appears. Select it. Continue
- Now, DO NOT just INSTALL. Click customize,
Besides the default checked options, just check these following additional options from Customize Install
Bootloader: PC EFI V9
Decrypters: AppleDecrypt
SMBIOS drivers: SMBIOS-EFI Air
ACPI: x86
Drivers: VGA drive: X3100,
Intel AHCI SATA
then done with customize
- install (skip DVD disk check). it will take about 20 minutes.
- Once complete, remove DVD. restart to boot on hard disk (it may ask for turn off PC, so do it)
3. Start Leopard
- Once booting with with hard disk (the first Leopard boot up), it takes very long time (watching the HDD LED is still flashing, though the screen may turn to black). Be patient for at least 30-40min
- Leopard is finally up and running, for the first configuration
4. Keyboard and Mouse recognization
- the m1330 keyboard and mouse pad should be recognized (with ACPI; x86). If not, plug in a USB keyboard and UBS mouse. they should be recognized.
- follow the step until "How Do You Connect?" window, answer not connect to the internet
- Fill in bogus info for registration fields
- Create account by using user (eqian) and my internet password
5. Problems remained:
- Power on booting very slow (could be 30min)
Monday, May 4, 2009
Windows vs. Mac - A Fair Perspective
I am working on getting a Leopard running in a PC. Here is what I had learned: It is easy for Apple to claim a MAC OS works perfectly for a one kind of MAC; However it is not that easy for Microsoft to claim the Windows works perfectly for all kinds of PCs.
Two full weekends have been spent for just bringing the very basic OS X functions working on my Dell. No sound, no networking, some keys on the keyboard do not even work :-)
But why I insisted on doing it? After a few difficult tries, it caused me very obsessed. I could just simply go out to grab a MAC Mini for only 600 bucks. Yes, call me crazy.
It’s just an experiment, to me. No one in world so far can claim everything on PC working under Mac OS X. The reason is so obvious. It’s very simple and easy for Apple to makes sure OS X working just for a Mac, the one kind. Microsoft, however, has to make sure Windows to be able to support millions of different PCs (even home-made ones) with so vast array of different devices (keyboards, mice, video cards, sound cards, NICs, Bluetooth, Wi-Fi, …).
So such dirty adaptation work have to fall into all OS X hackers’ shoulders. It reminds me the early days when I was installing a Linux on a PC back in early 90's time.
Two full weekends have been spent for just bringing the very basic OS X functions working on my Dell. No sound, no networking, some keys on the keyboard do not even work :-)
But why I insisted on doing it? After a few difficult tries, it caused me very obsessed. I could just simply go out to grab a MAC Mini for only 600 bucks. Yes, call me crazy.
It’s just an experiment, to me. No one in world so far can claim everything on PC working under Mac OS X. The reason is so obvious. It’s very simple and easy for Apple to makes sure OS X working just for a Mac, the one kind. Microsoft, however, has to make sure Windows to be able to support millions of different PCs (even home-made ones) with so vast array of different devices (keyboards, mice, video cards, sound cards, NICs, Bluetooth, Wi-Fi, …).
So such dirty adaptation work have to fall into all OS X hackers’ shoulders. It reminds me the early days when I was installing a Linux on a PC back in early 90's time.
Sunday, May 3, 2009
The Leopard is Running on my Dell Laptop
Finally, the Leopard is running on my Dell laptop!

That’s so called a Hackintosh.
Monday, April 6, 2009
iPhone Gold Rush
Will mobile phone application development make many programmers rich? Then think twice.
Thought of doing it... however the iPhone SDK requires me to buy a Mac, plus other hurdles as lack of good app ideas, Apple will rip off another 30% of revenue sharing, converting to Objective-C from my C# dialect. :-)
Actually the biggest hurdle is that my wolfish employer sucks up all my spare time!!!
That's why I need an entrepreneur boot camp this Saturday with you eggheads.
Saturday, December 13, 2008
Got My iPhone

Things have seemed to change
There is one thing that’s still the same
In my heart you have remained
And we can fly fly fly away
Yes, babe, you’re not lost
The way as Michael Bublé sang.
Thursday, October 16, 2008
Network Attached Storage with D-Link DNS-323
The product name is DNS-323 made by D-Link.
http://www.dlink.com/products/?sec=0&pid=509#
The key technical term here is NAS (Network Area Storage), comparing with the traditional hard drive mounted inside a PC. By putting the hard drive (Storage) outside in the network, so any PC whichever connects to the network can access this storage. So sometimes people call this concept as Network Shared Storage.
Here is a nice tutorial video
http://www.dlinktv.com/?vid=1
The data stored and shared in the DNS-323 are actually secured by setting access passport in the DNS-323 via configuration. PCs/laptops, which though connect to the network but do know the password, cannot access the data stored in the DNS-323.
Here is a good example of network connection diagram (I did almost exactly the same at our home):
http://www.dlink.com/products/resource.asp?pid=509&rid=1954
The DNS-323 box has two bays and can host to hard drives (3.5 inch SATA drives at any size, say 100, 250, 500Mbytes,… ). I only use one hard drive (500Mbytes), so another bay is empty. There is an initial configuration to setup this box. Then in normal case, no more configuration is needed for regular daily use.
Configuration is mainly involved for
- Setting password to protect your data in this box from unwanted access
- Set IP address to this box, so other PC can recognize it.
The configuration is something like this:
http://images.dlink.com/products/DNS-323/utility.gif
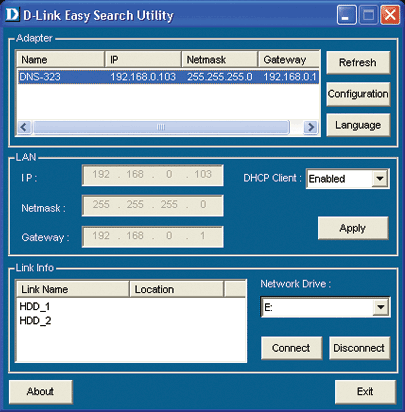
Key hint:
- Assign a static (fixed) IP address to this box, so your PC and laptop can always easily recognize it
- On each PC, map DNS-322 as just another logical drive (assign a letter of your choice, e.g. I use Q:) like C:, D:, etc.. Here is the step:
Start ==> Network ==> Map Network Drive… ==> assign a letter to Drive, browse to find this DNS-323 by looking for the IP address or its alias name you ever named this box during its configuration time.
After all this necessary setup, this network hard drive will be accessible from any PC as a Q: drive on your PC whenever you connect to the home network.
Saturday, October 4, 1997
The Tao of Product Management
There is a customer requirement. A Product Line Manager (PLM, as a fancy name nowadays, was called product planner in a planning organization back to the old time when I worked at BNR) normally would add his or her value by explaining (and mostly interpreting) the requirement to R&D. Until the final release of the product, many R&D levels have been involved with possible miscommunications happened at each level. Let’s see how this new product has been built eventually, step by step … … while the PLM was off hook.
1. Requirement Captured
2. Negotiated between Planner & Designers

3. Functional Spec & Design (before reviews)

4. Functional Spec & Design (after reviews)

5. Detail Design

6. Implementation (after code inspection)

7. Unit Testing (after debugging)

8. System Testing (after robustness)

What the customer needs !!!

[The original idea was taken in the early 90’s from a frustrated software designer at Bell-Northern Research, a former research arm of Northern Telecom.]
Subscribe to:
Posts (Atom)